23.09.2017: Updated instructions for 10.0.x release of GitLab Runner.
This post describes how to setup gitlab-runner on an Uberspace using the shell executor.
Download gitlab-runner-linux-amd64
Download the Runner binary into the ~/bin directory and make it executable:
$ mkdir ~/bin
$ cd ~/bin
$ wget https://gitlab-runner-downloads.s3.amazonaws.com/latest/binaries/gitlab-runner-linux-amd64
$ chmod +x gitlab-runner-linux-amd64
Create a working directory for the Runner:
$ mkdir ~/gitlab-ci
Get configuration details for the Runner
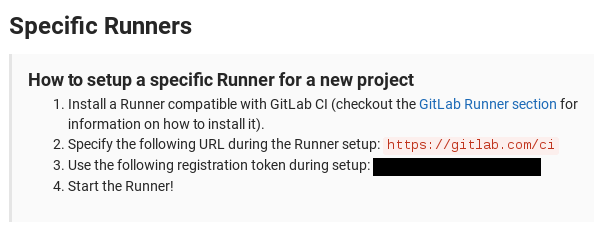
In your GitLab project navigate to Settings > CI/CD Pipelines. Find the URL for the runner setup and the registration token as shown in the picture below:
Register the Runner
Provide the configuration details when asked and make sure to choose shell as executor:
$ ./gitlab-runner-linux-amd64 register
WARNING: Running in user-mode.
WARNING: The user-mode requires you to manually start builds processing:
WARNING: $ gitlab-runner run
WARNING: Use sudo for system-mode:
WARNING: $ sudo gitlab-runner...

Please enter the gitlab-ci coordinator URL (e.g. https://gitlab.com/):
https://gitlab.com/ci
Please enter the gitlab-ci token for this runner:
<TOKEN>
Please enter the gitlab-ci description for this runner:
[<DESCRIPTION>]:
Please enter the gitlab-ci tags for this runner (comma separated):
<YOUR TAGS>
Whether to run untagged builds [true/false]:
[false]:
Whether to lock Runner to current project [true/false]:
[false]:
Registering runner... succeeded runner=wenFG1n6
Please enter the executor: docker, docker-ssh, parallels, shell, docker+machine, ssh, virtualbox, docker-ssh+machine, kubernetes:
shell
Runner registered successfully. Feel free to start it, but if it's running already the config should be automatically reloaded!
Create a daemon to start the Runner
Create a daemon to start your GitLab Runner automatically on reboot and have it supervised. See https://wiki.uberspace.de/system:daemontools for reference.
First, setup your service directory:
$ test -d ~/service || uberspace-setup-svscan
Create a script called gitlab-ci inside your ~/bin directory. Note the exec command which prevents spawning a new process and allows the daemontools to fully control the Runner:
#!/usr/bin/env bash
exec ~/bin/gitlab-runner-linux-amd64 run --working-directory ~/gitlab-ci
Make the script executable:
$ chmod +x ~/bin/gitlab-ci
Activate the daemon:
$ uberspace-setup-service gitlab-ci ~/bin/gitlab-ci
Creating the ~/etc/run-gitlab-ci/run service run script
Creating the ~/etc/run-gitlab-ci/log/run logging run script
Symlinking ~/etc/run-gitlab-ci to ~/service/gitlab-ci to start the service
Waiting for the service to start ... 1 2 3 4 5 6 started!

Congratulations - the ~/service/gitlab-ci service is now ready to use!
To control your service you'll need the svc command (hint: svc = service control):

To start the service (hint: u = up):
  svc -u ~/service/gitlab-ci
To stop the service (hint: d = down):
  svc -d ~/service/gitlab-ci
To reload the service (hint: h = HUP):
  svc -h ~/service/gitlab-ci
To restart the service (hint: du = down, up):
  svc -du ~/service/gitlab-ci

To remove the service:
  cd ~/service/gitlab-ci
  rm ~/service/gitlab-ci
  svc -dx . log
  rm -rf ~/etc/run-gitlab-ci

More information about controlling daemons can be found here:
https://uberspace.de/dokuwiki/system:daemontools#wenn_der_daemon_laeuft
For details on how to manage a daemon see https://wiki.uberspace.de/system:daemontools#wenn_der_daemon_laeuft
That’s it!
Your GitLab Runner should now be ready to process your builds if your project is configured correctly. See https://docs.gitlab.com/ce/ci/ for reference.